
ASP.NET Blazorサーバーで、SQL Serverのテーブルデータを表示してみます。
事前準備
SQL Serverのセットアップ
SQLサーバ名:YAMAKITA\DB (SSMS オブジェクトエクスプローラーのツリー最上位の名称です。)
データベース名:TestDB
テーブル名:TestTable
ログインユーザー:TESTUSER
ログインパスワード:任意
テーブルスキーマ
テストで使用していたデータベースを使い回します。
insertDate 日付型
username 文字列型
qrdata int型
プロジェクトの作成
Visual StudioにてBlazor Web アプリケーションを作成します。
.NET 8.0 で作成します。以下をNuGetでインストールします。
Microsoft.AspNetCore.Components.QuickGrid
Microsoft.EntityFrameworkCore
Microsoft.EntityFrameworkCore.SqlServer
取得するデータベースのクラスを作成します。
SqlDbContext.cs
using Microsoft.EntityFrameworkCore;
using System.ComponentModel.DataAnnotations.Schema;

namespace Data
{
  public partial class SqlDbContext : DbContext
    {
        public SqlDbContext(DbContextOptions<SqlDbContext> options) : base(options)
        {
        }
        public DbSet<Record> Records { get; set; }
    }
    [Keyless]//主キーの設定がない場合は必ず記載すること
    [Table("TestTable")]
    public partial class Record
    {

        [Column("insertDate")]
        public DateTime InsertDate {  get; set; }

        [Column("username")]
        public string Username { get; set; }

        [Column("qrdata")]
        public int qrdata { get; set; }
    }
}
接続文字列の登録
秘匿性を高めるために、ユーザーシークレットに格納します。
プロジェクトを右クリックしてユーザーコントロールの管理を選択し、以下を記載します。
{
  "ConnectionStrings": {
    "SqlDbContext": "Server=YAMAKITA\\DB; Initial Catalog=TestDB; User ID=TESTUSER; Password=任意のPW ;Encrypt=true; TrustServerCertificate=True;"
  }
}
これをProgram.csで利用します。
using Data;
using Microsoft.EntityFrameworkCore;

var builder = WebApplication.CreateBuilder(args);

// Add services to the container.
builder.Services.AddRazorComponents()
    .AddInteractiveServerComponents();

// Configure the HTTP request pipeline.
builder.Services.AddPooledDbContextFactory<SqlDbContext>(opt =>
{
  //ここで接続文字列を使用する
    opt.UseSqlServer(builder.Configuration.GetConnectionString("SqlDbContext"));
});

var app = builder.Build();


if (!app.Environment.IsDevelopment())
    {
        app.UseExceptionHandler("/Error", createScopeForErrors: true);
        // The default HSTS value is 30 days. You may want to change this for production scenarios, see https://aka.ms/aspnetcore-hsts.
        app.UseHsts();
    }


app.UseHttpsRedirection();

app.UseStaticFiles();
app.UseAntiforgery();

app.MapRazorComponents<App>()
    .AddInteractiveServerRenderMode();

app.Run();
ページを作成しましょう。
@page "/SqlList"
@using Data
@using Microsoft.EntityFrameworkCore
@using Microsoft.AspNetCore.Components.QuickGrid
@inject IDbContextFactory<SqlDbContext> DbFactory
@if(records == null)
{
<div>データロード中</div>
}
else
{
<div>
<QuickGrid Items="@records">
<PropertyColumn Property="@(a => a.InsertDate)" Title="日付"/>
<PropertyColumn Property="@(a => a.Username)" Title="ユーザー名" />
<PropertyColumn Property="@(a => a.qrdata)" Title="QRデータ" />
</QuickGrid>
</div>
}
@code{
private IQueryable<Record>? records = null;
protected override async Task OnInitializedAsync()
{
await using (var pubs = await DbFactory.CreateDbContextAsync()){
records = (await pubs.Records.ToListAsync()).AsQueryable();
}
}
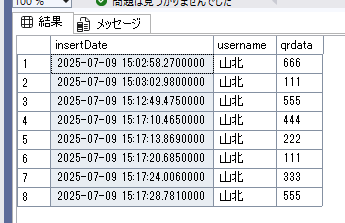
}成功すると以下のように表示されるはずです。

お疲れ様でした。

コメント